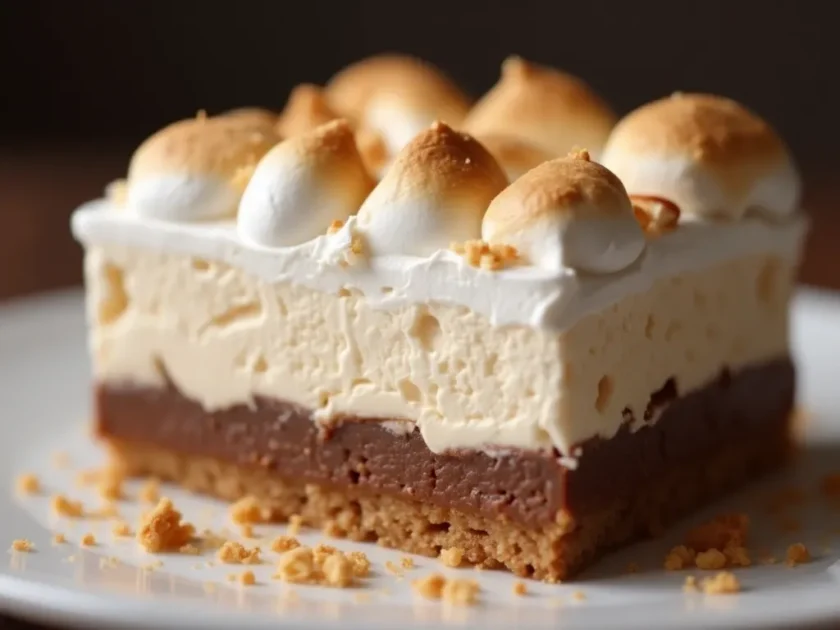
S’mores Ice Cream Cake – The Best Summer Dessert!
S’mores Ice Cream Cake is the ultimate no-bake summer dessert. Learn how to make this irresistible treat with marshmallows, chocolate, and graham crackers. Contents hide 1 Essential Ingredients for S’mores Ice Cream Cake 1.1 – Marshmallows, Chocolate, and Graham Crackers: The Big Three 1.2 – Choosing the Right Ice Cream Flavor 2 How to Make…
S’mores Ice Cream Cake is the ultimate no-bake summer dessert. Learn how to make this irresistible treat with marshmallows, chocolate, and graham crackers.
Essential Ingredients for S’mores Ice Cream Cake
– Marshmallows, Chocolate, and Graham Crackers: The Big Three
When it comes to S’mores Ice Cream Cake, the big three ingredients — marshmallows, chocolate, and graham crackers — are what make this dessert truly irresistible. Let’s break down exactly what you’ll need:
- Graham Cracker Crust:
- 2 cups crushed graham cracker crumbs (about 14 full graham crackers)
- 6 tablespoons unsalted butter, melted
- 2 tablespoons granulated sugar
- Marshmallow Fluff Layer:
- 1 cup marshmallow cream (like Marshmallow Fluff or Jet-Puffed)
- Chocolate Layer:
- 1 cup semisweet chocolate chips or chopped chocolate (you can use milk or dark, depending on your preference)
- 1 tablespoon coconut oil or vegetable oil (helps keep the chocolate smooth)
- Ice Cream Base:
- 1.5 quarts vanilla ice cream (softened slightly for easier spreading)
- Optional: add mini marshmallows (½ cup) or chocolate chunks (½ cup) for extra texture
These ingredients work together to recreate the nostalgic flavors of a classic campfire S’more — but in frozen, sliceable form.
– Choosing the Right Ice Cream Flavor
Vanilla is the classic go-to, but there’s plenty of room to get creative:
- Vanilla Ice Cream (1.5 quarts): A neutral base that lets the marshmallow and chocolate flavors shine.
- Chocolate Ice Cream (1.5 quarts): For die-hard chocolate lovers who want an extra-rich dessert.
- Rocky Road or S’mores-flavored Ice Cream (1.5 quarts): If you’re feeling adventurous, use pre-flavored ice cream that already includes marshmallows and chocolate chunks for an even more indulgent treat.
Pro Tip: If using multiple ice cream flavors, consider layering them for added visual appeal and a burst of flavor in every bite.
How to Make S’mores Ice Cream Cake at Home
– Preparing the Graham Cracker Crust
The foundation of any great S’mores Ice Cream Cake starts with a solid graham cracker crust. Here’s how to get it right:
- Crush the graham crackers:
Place 14 full graham crackers in a resealable plastic bag and crush them with a rolling pin, or pulse them in a food processor until they’re fine crumbs. - Combine ingredients:
In a medium bowl, mix 2 cups graham cracker crumbs with 6 tablespoons of melted unsalted butter and 2 tablespoons of granulated sugar. Stir until the crumbs are well coated and resemble wet sand. - Press the crust:
Pour the mixture into a 9-inch springform pan or deep pie dish. Press it down firmly with the bottom of a measuring cup or your hands to create an even layer that covers the bottom and slightly up the sides. - Freeze the crust:
Place the crust in the freezer for at least 15 minutes to firm up while you prepare the rest of the layers.
– Layering Ice Cream and Marshmallow Cream
Now it’s time to assemble the star of the show! Here’s how to layer your S’mores Ice Cream Cake like a pro:
- Soften the ice cream:
Let 1.5 quarts of vanilla ice cream sit at room temperature for about 10 minutes to make it easier to spread. - Spread the first layer:
Remove the crust from the freezer. Spoon about half of the softened ice cream onto the crust and spread it evenly with an offset spatula or the back of a spoon. - Add marshmallow cream:
Gently spread 1 cup of marshmallow cream over the ice cream layer. If it’s too thick to spread easily, warm it slightly in the microwave for 5–10 seconds (be careful not to overheat). - Top with the remaining ice cream:
Spoon the remaining ice cream over the marshmallow layer, smoothing it out to create a flat surface. - Freeze the cake:
Place the assembled cake in the freezer for at least 4 hours, or until firm enough to slice. - Prepare the chocolate layer:
Melt 1 cup of semisweet chocolate chips with 1 tablespoon of coconut oil or vegetable oil in a microwave-safe bowl, stirring every 20 seconds until smooth. - Finish with chocolate drizzle:
Once the cake is frozen, drizzle the melted chocolate over the top, letting it drip down the sides for a rustic look. Sprinkle with additional crushed graham crackers or mini marshmallows if desired.
With these steps, you’ll have a stunning S’mores Ice Cream Cake that’s not only easy to make but also delivers that nostalgic summer flavor in every bite.
Get creative with toppings—try adding a fruity twist like our Banana Cream Pie: The Perfect Recipe for a Delicious Dessert or add a crunch by pairing it with Banana Pudding Bars: Easy Recipe and Quick Prep.
Creative Variations on the Classic
– Adding Peanut Butter or Nutella for a Twist
If you’re a fan of adding a nutty or chocolaty twist to your desserts, consider incorporating peanut butter or Nutella into your S’mores Ice Cream Cake. Here’s how:
- Peanut Butter Swirl:
- Warm ½ cup of creamy peanut butter in the microwave for about 10 seconds to soften it.
- Drizzle it over one of the ice cream layers before freezing to add a sweet and salty balance that pairs beautifully with the marshmallow and chocolate flavors.
- Nutella Layer:
- Spread ½ cup of Nutella between ice cream layers or drizzle it on top before adding the final chocolate drizzle.
- This adds a creamy, hazelnut-chocolate flavor that takes your S’mores Ice Cream Cake to a whole new level.

Not only do these additions enhance the overall flavor, but they also add a delightful surprise to every bite.
– Vegan and Dairy-Free Alternative
Don’t let dietary restrictions hold you back from enjoying this delicious dessert. Here’s how to make a vegan or dairy-free S’mores Ice Cream Cake:
- Dairy-Free Ice Cream:
- Use 1.5 quarts of your favorite dairy-free ice cream (such as coconut milk, almond milk, or oat milk-based ice cream).
- Flavors like vanilla, chocolate, or even marshmallow swirl are great choices.
- Vegan Marshmallow Cream:
- Look for store-bought vegan marshmallow cream or make your own using aquafaba (the liquid from canned chickpeas) and sugar whipped until fluffy.
- Vegan Graham Crackers:
- Many graham crackers are naturally vegan, but double-check the ingredients to ensure they don’t contain honey or other animal products.
- Dairy-Free Chocolate Drizzle:
- Use dairy-free chocolate chips or dark chocolate and melt with coconut oil for that luscious final drizzle.
These variations ensure everyone can indulge in the sweet, summery goodness of S’mores Ice Cream Cake—no campfire required!
A rich and creamy option: No-Bake Peanut Butter Banana Pie Dessert that’s perfect for peanut butter lovers.
Tips for Assembling and Freezing Your Cake
– Layering Techniques for a Stunning Look
The key to a show-stopping S’mores Ice Cream Cake is thoughtful layering. Here’s how to ensure each bite is as delicious as it is beautiful:
- Even Spreading:
- Use an offset spatula to evenly spread each layer of ice cream, marshmallow cream, and any additional flavors. This not only improves the cake’s presentation but also prevents air pockets that can cause uneven freezing.
- Firm Crust Foundation:
- Make sure the graham cracker crust is firmly pressed and completely frozen before adding the ice cream layers. This prevents the crust from crumbling or mixing with the ice cream.
- Alternating Layers:
- For added visual appeal, alternate between different ice cream flavors or mix-ins (like mini marshmallows or chocolate chunks) to create a colorful and dynamic cross-section when you slice the cake.
– Keeping Your Cake Firm and Easy to Slice
Nothing’s worse than a melting mess when you’re ready to serve. Here’s how to keep your S’mores Ice Cream Cake firm and easy to slice:
- Freeze Overnight:
- Once assembled, freeze the cake for at least 4 hours—or preferably overnight—to ensure all layers are fully set and sliceable.
- Wrap for Freshness:
- Cover the cake tightly with plastic wrap or aluminum foil to prevent freezer burn and to keep unwanted odors at bay. If you have a springform pan, you can also wrap the outside of the pan for added protection.
- Warm Knife Trick:
- When ready to slice, dip a sharp knife in warm water and wipe it dry before cutting each slice. This technique helps you achieve clean, smooth cuts without dragging the layers.
- Serving Slices:
- For easy serving, use a pie server or a flat spatula to lift the slices out of the pan. If the cake is too hard to slice, let it sit at room temperature for 5–10 minutes before cutting.
These tips ensure that your S’mores Ice Cream Cake is as easy to serve as it is delightful to eat—no fuss, no mess, just pure dessert bliss.
An indulgent classic: Easy No-Bake Banana Pudding Cheesecake Recipe that’s sure to please any crowd.
Serving and Garnishing Ideas
– Drizzling with Chocolate Sauce
Nothing elevates a S’mores Ice Cream Cake quite like a generous drizzle of chocolate sauce. This final touch not only adds an extra punch of flavor but also gives your cake a glossy, mouthwatering finish.
- Simple Chocolate Drizzle:
- Melt 1 cup of semisweet chocolate chips with 1 tablespoon of coconut oil (or vegetable oil) in a microwave-safe bowl. Heat in 20-second intervals, stirring between each, until smooth and glossy.
- Use a spoon to drizzle the chocolate over the top of the cake, letting it naturally drip down the sides for that rustic, irresistible look.
- Optional Toppings:
- Sprinkle with mini chocolate chips, shaved chocolate, or cocoa powder to enhance the presentation and add a delicious textural contrast.
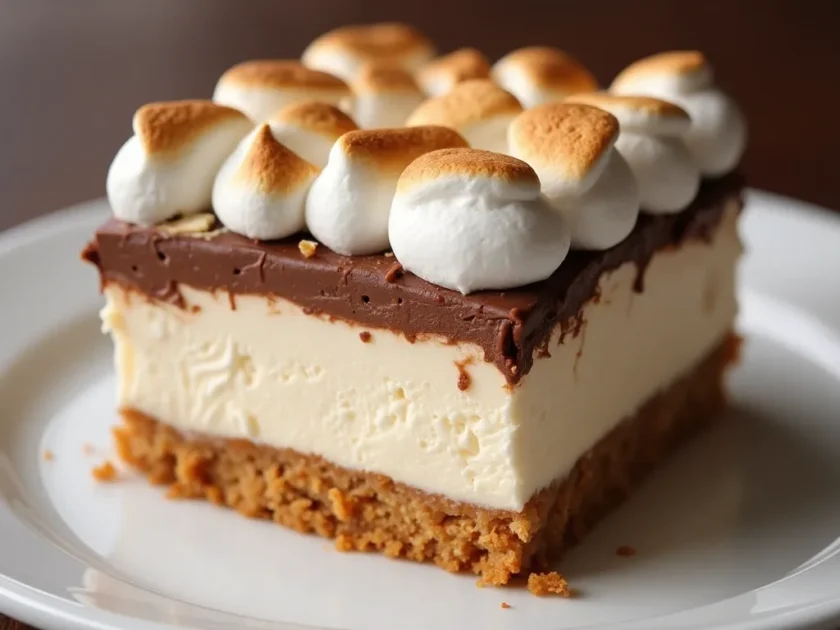
– Adding Toasted Marshmallows and Graham Cracker Crumbs
Take your S’mores Ice Cream Cake from delicious to unforgettable by adding toasted marshmallows and a sprinkle of graham cracker crumbs:
- Toasted Marshmallow Topping:
- Arrange mini marshmallows on top of the cake and toast them using a kitchen torch for that classic campfire flavor. If you don’t have a torch, briefly place the cake under the broiler (watch carefully to prevent melting).
- The lightly charred marshmallows add a nostalgic touch and a delightful crunch.
- Graham Cracker Sprinkle:
- Crush a few extra graham crackers and sprinkle them generously over the cake’s top.
- This not only reinforces the classic s’mores flavor but also adds a satisfying crunch in every bite.
- Optional Touch:
- Add a few chocolate shavings or chunks between the toasted marshmallows for a double dose of chocolatey goodness.
With these creative garnishing ideas, your S’mores Ice Cream Cake will be the showstopper of any summer gathering. It’s a dessert that looks as good as it tastes — and keeps everyone coming back for more.
Frequently Asked Questions (FAQs)
– Can I use different ice cream flavors in S’mores Ice Cream Cake?
Absolutely! Vanilla is classic, but you can experiment with chocolate, rocky road, or even coffee flavors. Layering different flavors can create a beautiful, unique cake that’s just as delicious as the traditional version.
– How long does it take to freeze S’mores Ice Cream Cake?
For best results, freeze the cake for at least 4 hours, but overnight is ideal. This ensures the cake is firm enough to slice cleanly and won’t melt too quickly when served.
– Can I make S’mores Ice Cream Cake ahead of time?
Yes! S’mores Ice Cream Cake is a perfect make-ahead dessert. You can prepare it up to 2 days in advance, cover it tightly, and keep it in the freezer until you’re ready to serve.
– What’s the best way to cut and serve S’mores Ice Cream Cake?
Dip a sharp knife in hot water, wipe it dry, and slice the cake while it’s still firm. Let it sit at room temperature for 5–10 minutes before serving if it’s too hard to cut.
– Is there a gluten-free version of S’mores Ice Cream Cake?
Absolutely! Use gluten-free graham crackers for the crust and check that all other ingredients are certified gluten-free to ensure your dessert is safe for those with gluten sensitivities.
– Can I make S’mores Ice Cream Cake without an oven?
Yes! This recipe is completely no-bake. You can prepare the entire cake using just your freezer and microwave (for melting chocolate), making it perfect for summer.
Conclusion
S’mores Ice Cream Cake is the ultimate summer treat, blending the nostalgic flavors of toasted marshmallows, gooey chocolate, and crunchy graham crackers into a refreshing frozen dessert. Whether you’re serving it at a backyard barbecue or a cozy family dinner, this cake is sure to delight guests of all ages. With creative variations, helpful layering and freezing tips, and easy-to-follow instructions, you’ll master the art of making this delightful cake at home.